
Turn Microfilm to Digital Files with nextScan's Microfilm Conversion Scanners [Infographic]
How nextScan® Streamlines the Microfilm to Digital Conversion Process...
While all microfilm scanners turn microfilm to digital, the technology employed differs greatly in terms of capabilities, performance, and reliability. As the microfilm archive supervisor, it is up to you to guarantee security and eliminate the threat of data loss. Understanding the capture method and quality control process used by your scanner will give you the confidence that your conversion process will result with all data being captured. For this reason, nextScan created the infographic below to visually show you how our scanners turn your microfilm to digital files in one scan.

STEP 1
Capture the Entire Ribbon from
Beginning to End and Top to Bottom
When converting microfilm with nextScan scanners all the records on your microfilm is captured as a digital ribbon using line scanning technology. Initially, the scanner operator sets the parameters for the job and begins the capture process. Your roll of microfilm continuously moves under the camera as it is simultaneously captured, line by line, at 8,192 pixels per line (or up to
16, 384 pixels per line with an optional upgraded optical configuration). Line scanning technology makes nextScan scanners unique by completely capturing the RAW image data, using TrueDPI at optimum speeds as fast as 2,000 frames per minute. This capture method allows nextScan to stand out from other scanners enabling our equipment to convert microfilm more efficiently.
Line scanning enables a useful quality control process and avoids lost data when turning your microfilm to digital searchable files. With nextScan’s NextStar®PLUS workflow software all ribbon data is captured initially in grayscale as a “Ribbon”. Your entire roll of microfilm is captured as one long high-resolution image that is a precise digital replica of your entire roll of microfilm – blips, edges, leader, and all. After capture, your team of Quality Control operators access the digital ribbon to apply post-scan image enhancements and edits to the images. Putting quality control in your operator’s hands is a critical step to verification that all images were captured as well as the confidence that you avoided missed or skipped images. Quality Assurance and 100% capture rate is critical and should be understood before beginning any project.
Step 2
Conduct Quality Control and Apply Image Enhancements
We all understand that microfilm and microfiche were created under different and sometimes not ideal photographic settings. This makes irregularities in the film common, which creates challenges when converting. Image enhancements and quality control can be performed on the ribbon after initial capture at the audit workstation, enabling higher quality of output and enhancing the accuracy of the overall process. Image quality control in NextStar®PLUS TM software is comprised of two critical steps:
1. Frame Detection
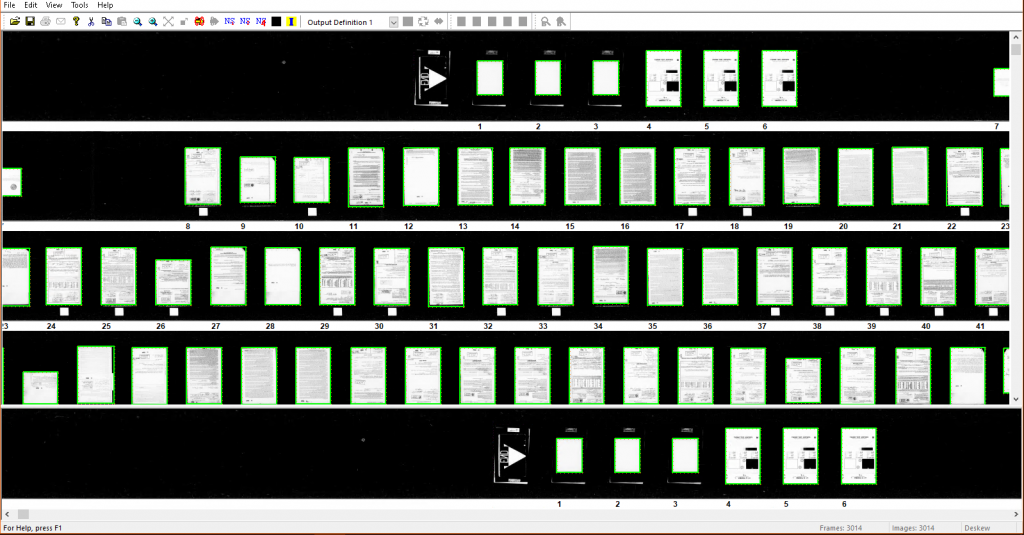
After a roll of microfilm or a sheet of fiche is scanned, NextStar®PLUS TM software automatically runs the frame detection settings that were configured for your type of film. Frame DetectionTM eliminates the need for rescanning because your entire ribbon has already been captured, and it simply refers to the process by which the software detects individual images on your ribbon of scanned film. When the operator opens the NextStar Auditor TM application, the individual images on your roll of film are determined by our software algorithm and boxed in as depicted by the green outlines around each frame in Figure 1. These boxed frames tell the software these images will be converted to individual digitized documents once the output process begins.
Using NextStar’s “BlackoutTM” tool operators can quickly and easily determine that all images were outlined in the Frame Detection process. The Blackout feature takes any green, outlined image and turns it black (Figure 2). This feature enables users to immediately identify any irregularities from the Frame Detection process, eliminating the need for rescans and confirming a complete digital duplication.
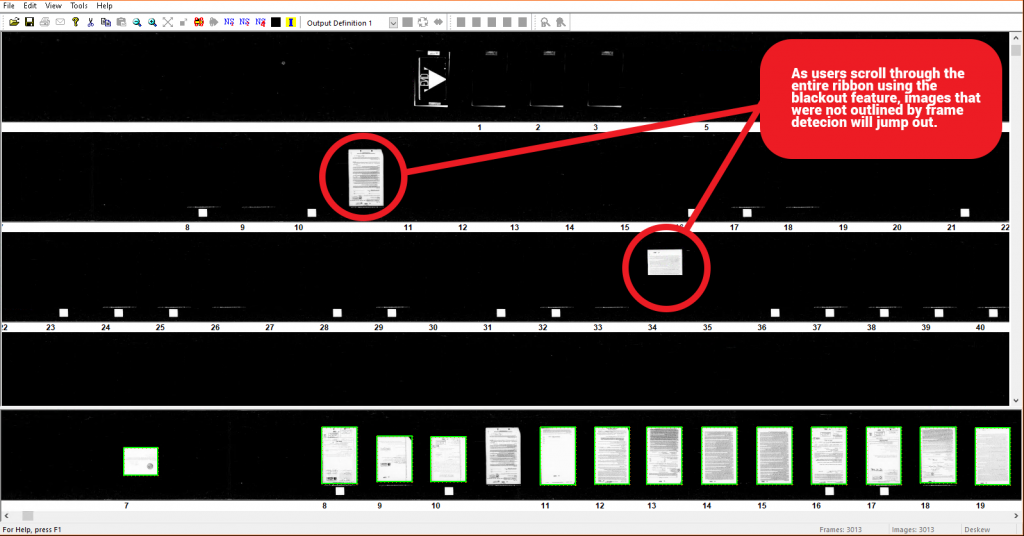
The operator conducting quality control will know that they need to either manually frame the images that were missed during the frame detection process or adjust their frame detection settings to automatically outline missed frames. nextScan makes it easy to apply different detection settings to sections of film that the standard detection was not able to detect. These challenging but not uncommon originals result from a shift in film density, over-exposed edges, mixed polarities, or images that were filmed without frame gaps. With nextScan’s Blackout tool missed frames are a problem of the past, as users can ensure the accuracy of the capture and that no images get left behind during final output.
2. Image Quality
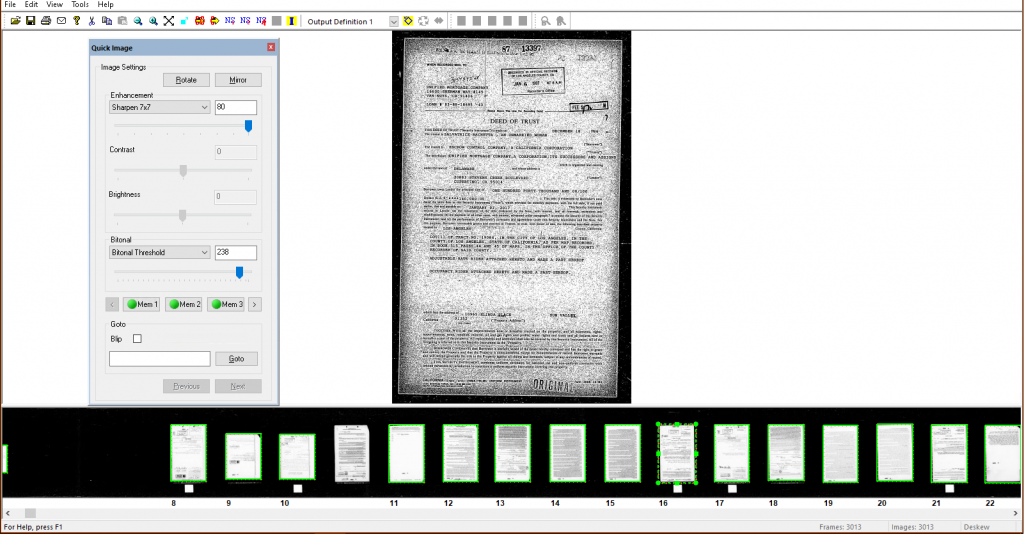
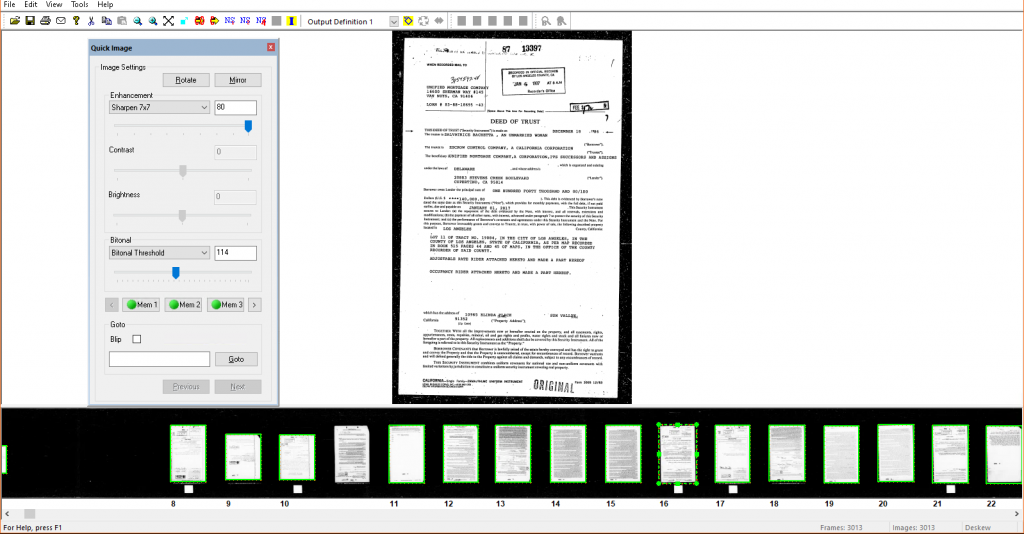
The second step to the NextStar®PLUS TM Image Quality Control Process is verifying that all the framed images are of desired quality. Operators ensure the scan was captured in focus using the correct saturation. Depending on the scope of the project, users can conduct a detailed analysis of each image individually or conduct a spot check to identify outliers that may need some manual adjustment. nextScan’s “Quick Image” tool enables the ability to automatically apply image enhancements and adjust images as they are being reviewed.
step 3
Output Your Microfilm to Digital Files
Once frame detection and image quality have been verified, users can output the images to the desired digital file type. Nextar®PLUS TM allows users to output to a number of file formats including TIFF Bitonal G3/G4, TIFF Uncompressed, Multi-page TIFF, JPEG, CALS, PDF/A, Multi-page PDF, JPEG 2000, JPEG XR (And others available upon request). Additionally, users can choose to run optical character recognition on the digitized files to make them word searchable.